6.3 Implementing a WuClass from Definition
In this section, we use the LED-controlled FBP defined in Section 4.2 as an example to explain the basic template of the Python program for each device. This template can be applied to Edison, Galileo and Raspberry Pi, to include some WuClass definitions of WuKongStandardLibrary.xml as mentioned in the previous section. Once an WuClass has been implemented according to the template, we can add this WuClass as a device in the same manner as Section 5.2.
Update WuKongStandardLibrary.xml on the IoT Boards
Please note that if you write a new wuclass definition in the master as mentioned in the previous section, remember to copy WuKongStandardLibrary.xml in the master to the IoT boards.
#Copy from master to Intel Edison:
cd <path_of_source_code>wukong/ComponentDefinitions/
scp WuKongStandardLibrary.xml root@<IP address of Intel Edison>:<path_of_source_code_on_Intel_Edison>wukong/ComponentDefinitions/
#Copy from master to Raspberry Pi:
cd <path_of_source_code>wukong/ComponentDefinitions/
scp WuKongStandardLibrary.xml pi@<IP address of Raspberry Pi>:<path_of_source_code_on_Raspberry_Pi>wukong/ComponentDefinitions/
WuKong Device Python Template
All Python samples of WuKong device can be found in the following directory: <path_of_source_code>/wukong/gateway/udpwkpf/udpdevice*.py. All WuClass codes to be used by WuObjects on a device are included in a device template as shown below:
  from twisted.internet import reactor
  from udpwkpf import WuClass, Device
  import sys

  if __name__ == "__main__":
      class XXX(WuClass):
          def __init__(self):
              WuClass.__init__(self)
              self.loadClass('XXX')

          def update(self,obj,pID=None,val=None):
              pass

      class MyDevice(Device):
          def __init__(self,addr,localaddr):
              Device.__init__(self,addr,localaddr)

          def init(self):
              cls = XXX()
              self.addClass(cls,0)
              self.addObject(cls.ID)

      d = MyDevice(sys.argv[1],sys.argv[2])
      reactor.run()
LED-control example code
Based on this device template, we have added two WuClasses, Button (Line 10) and Light-Actuator (Line 25), to realize a LED-control application in the following example code. If you have deployed that application on your device as in Section 4.2, this code should make more sense to you. On lines 6 and 7, the pins for the sensors are defined. Each WuClass has the init( ) method to initialize some data values, states and hardware parameters, and update( ) to accept WKPF's action invocation periodically or responsively. The code also defines MyDevice( ) which activates the device by starting all WuClasses on the device.
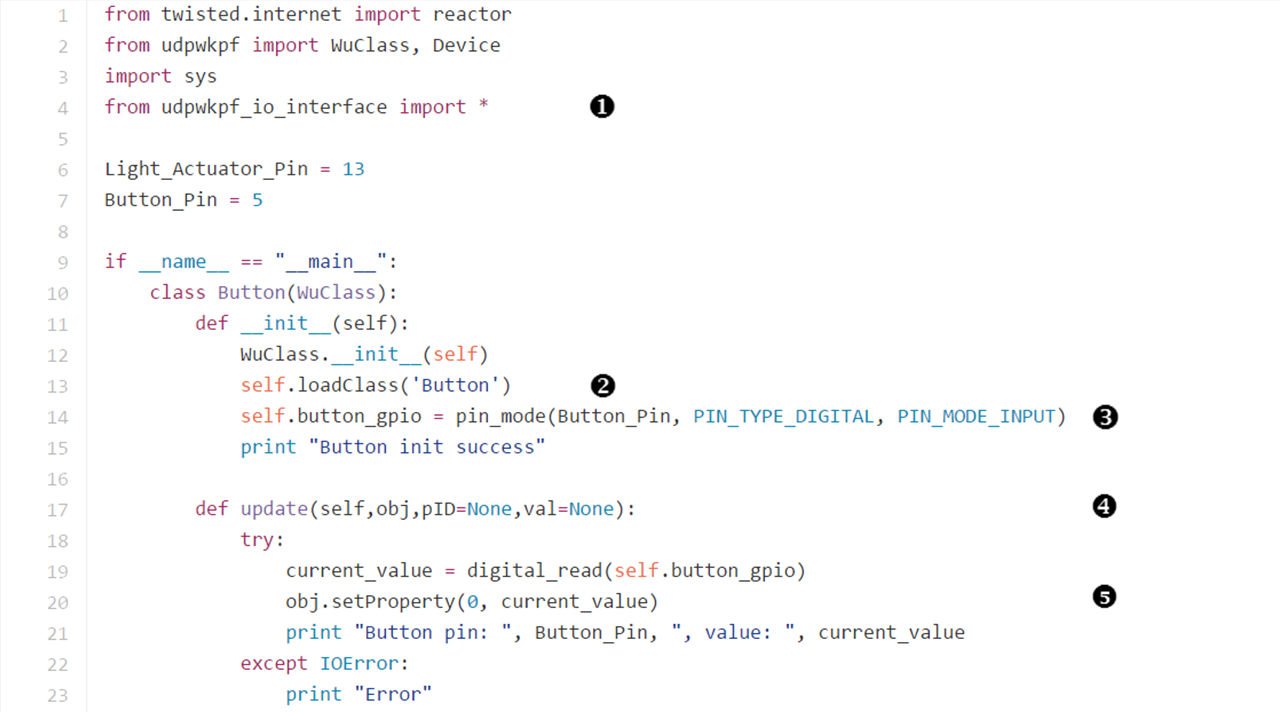
 Since we control button and LED through gpio, we need to import the gpio library for the IoT board. To make this template work with various IoT boards, we create an interface to define how to use gpio. We will see more about this interface in the next section.
  The input argument of self.loadClass function must be a WuClass name defined in the WuKongStandardLibrary.xml. With WuClass name, this function will parse all its attributes from WuKongStandardLibrary.xml file.
  Use the function of udpwkpf_io_interface.py to specify which gpio pin will be used. We also specify whether this pin is digital or analog, and whether its direction is input or output.
 Since button is a sensor, the update function should be run periodically to read sensing data from gpio. For this reason, we have defined a property with refresh_rate datatype for the button WuClass, so the update function of the button WuClass will be called by WKPF regularly.
  The setProperty function of button will send its value to WKPF which then propagates the value according to the data link of FBP. The first parameter of setProperty function is pID. In this example, pID=0 indicates the first property of button, which is current_value (you can confirm with the WuKongStandardLibrary.xml). That is, the current_value is going to be propagated.
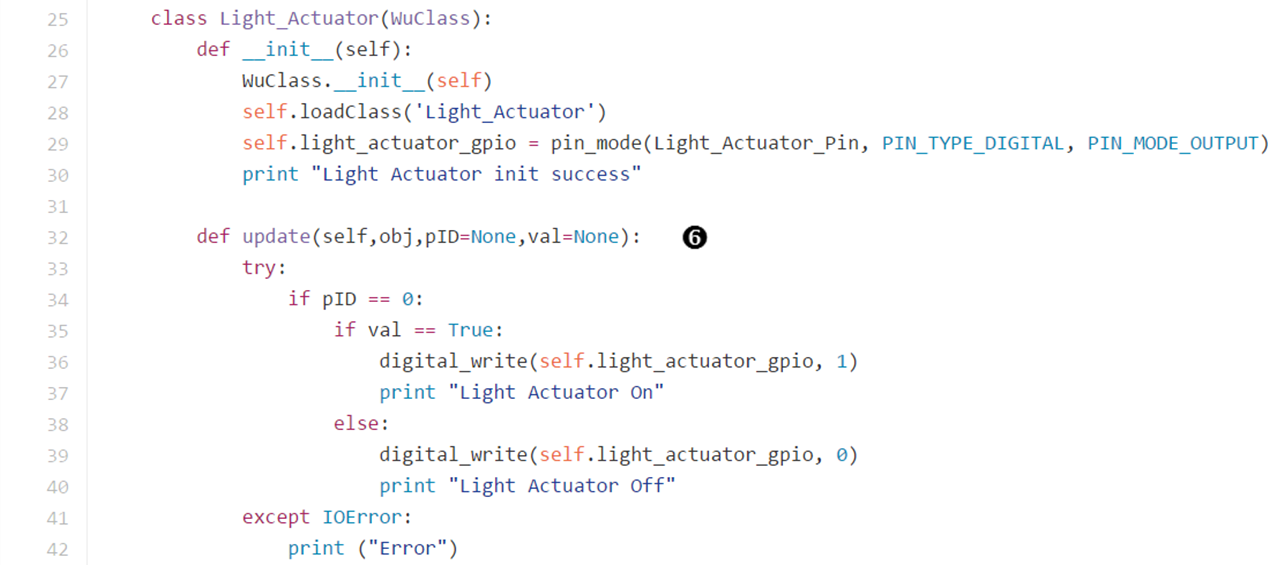
 This update function will be called whenever there is a new data propagated to the light actuator. And because we doesn't define a property with refresh_rate for the light actuator, its update function will only run responsively. For example, in the FBP of Ch4.2, when button is pressed, its value will propagate through data link to light actuator. And then, the update function of light actuator will be called by WKPF. WKPF also passes three parameters including obj(WuObject of light actuator), pID(which property of WuObject going to be updated), and value. After being called, the update function will turn on or off the light actutator responsively.
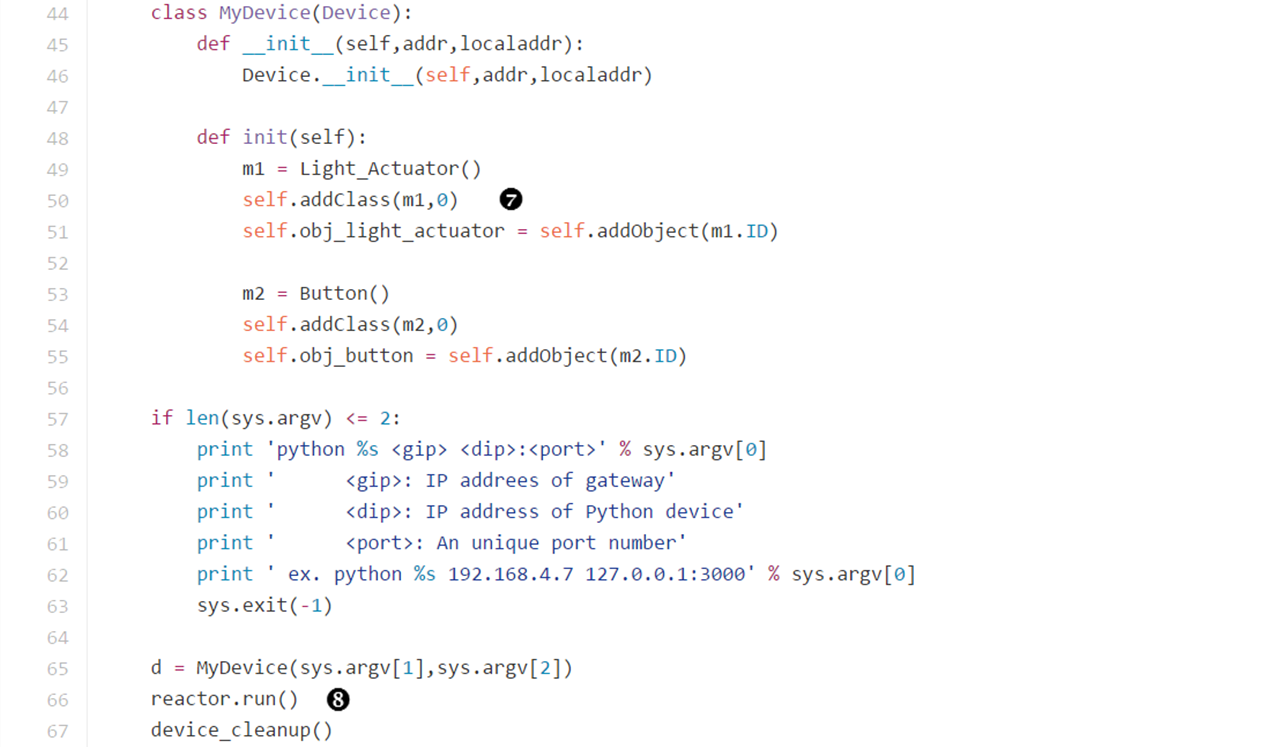
  Add WuClass to the WuClass list of the WuKong device so that this WuClass will share the same WKPF as other WuClasses on a node. About the second parameter of addClass function, this value indicates whether this WuClass can be used to create objects. "0" means this WuClass can't create objects. That's why we use addObject function in the next line to create an object(self.obj_button) for the device. In the Ch7.3, we will use a WuClass which can create objects.
  Don't forget to add reactor.run() or else the value of button will neither be refreshed periodically nor be propagated to light actuator through data link.
 Summary
In this section, we show the steps to implement the Python code for an IoT device:
- Copy the template to a new file as <path_of_source_code>/wukong/gateway/udpwkpf/udpdevice_XXX.py
- Write a WuClass for each of the sensors according to the pattern of Button, or write a WuClass for actuator according to the pattern of Light_Actuator.
- Add WuClass to MyDevice and use this WuClass to create an object on the device.